Map features are a core capability in many B2B projects. Whether we go with native Android app development or a cross-platform app that covers iOS and Android depends on offline requirements, the desired performance, and the feature scope. OpenStreetMap is a flexible alternative to Google Maps in both worlds.
To integrate OpenStreetMap with OSMSharp, the following steps are required:
As a bonus, there are the following two items:
What is OpenStreetMap?
OpenStreetMap, or OSM for short, is a project where anyone can collect geographic material about roads, forests, rivers, buildings, etc. and compile it into a map of the world. You can learn more about the project at www.openstreetmap.org.
Connecting Xamarin Android with OSMSharp
To follow the steps in the article, you need to create a Xamarin.Android project in Visual Studio. Then, download the libraries placed on bitbucket for this article from the Referenced Assemblies folder and add them to your project as a reference.
You should still be able to build the project. Unfortunately, it no longer worked with the packages available on NuGet.
Specifying the tile provider as the source for the map material
In order for OSMSharp to display geographic material in the Android app at all, it needs a source to load the small tiles that contain only a section of the map. OSM provides various servers for this purpose. An overview of the available ones can be found at https://wiki.openstreetmap.org/wiki/Tile_servers. Of course you can also run your own tiles server if you want to.
As you can see from the overview, the choice of the tile provider can also determine the display - color, line thickness etc. - of the map. - with the choice of the tile provider. It's best to copy the URL, because we need it in the next step.
Presenting an OpenStreetMap
A simple OSM map can be implemented with OSMSharp with little code. To do this, we first need a MapView instance. It represents the visible area of the map in our app. Since I want to use the map fully in the app, I directly assign the instance to the activity with SetContentView.
Of course, our MapView also needs a map. So I create an instance of Map and assign it to the MapView.Map property. In order to be able to see something of the map, we need the URI of the previously selected tile provider. We add this to the map instance with the AddLayerTile method. From now on the map takes over all further steps to be able to display map data for example by moving the map.
It is important to mention that Native.Initialize(); must be called before working with OSMSharp.
The OnCreate method now looks like this:
    protected override void OnCreate(Bundle savedInstanceState)
    {
        base.OnCreate(savedInstanceState);

        try
        {
            Native.Initialize();

            _mapView = new MapView(this, new MapViewSurface(this));
            _mapView.MapTilt = 0;
            _mapView.MapCenter = new GeoCoordinate(52.207767, 8.803513);
            _mapView.MapZoom = 12;
            _mapView.Map = new Map();

            _mapLayer = _mapView.Map.AddLayerTile("http://a.tile.openstreetmap.de/tiles/osmde/{0}/{1}/{2}.png");

            SetContentView(_mapView);
        }
        catch(Exception ex)
        {
            Console.WriteLine(ex);
        }
    }
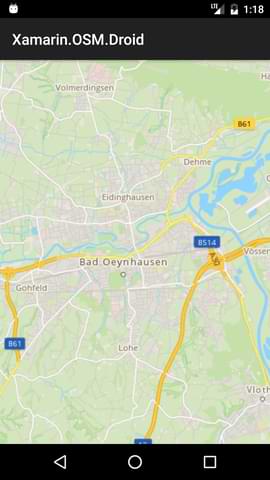
The image on the left is the map with the default OpenStreetMap style. Just like iOS, by using a different tile server as the source for our map, we have a more appealing style for the map on the right.

Display marker on the map
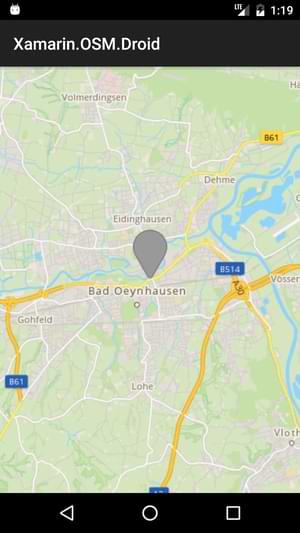
In the previous step, the map was centered on the Cayas Software headquarters by setting MapCenter. To make it more recognizable it is time to position a marker on the map. OSMSharp provides for markers the MapMarker class for which the following two pieces of information are needed:
- the position where we want to place the marker
- an image that represents the marker.
With that, the rest is a small piece of code:
    using (var bitmap = BitmapFactory.DecodeResource(Resources, Resource.Drawable.pin))
    {
        var marker = new MapMarker(this, new GeoCoordinate(52.207767, 8.803513), MapMarkerAlignmentType.CenterBottom, bitmap);
        _mapView.AddMarker(marker);
    }
The pin graphic is simply added to the project in the drawables folder. The result is already impressive.
Using maps offline
One of the main reasons I've been playing around with OSMSharp and OpenStreetMap is the ability to use maps in offline scenarios. To be comparable to the iOS article, I'm focusing on MBTiles as the data source.
To allow OSMSharp to use the map section from the mbtiles files, I include them as an asset in the Android project for simplicity's sake. This way, no downloading needs to be implemented. In the app, we need to retrieve a stream to the file and tell the MBTile layer the name of the database. With a few lines of code, this can be implemented as follows:
    using (var mapStream = File.OpenRead("./demo_layers.mbtiles"))
    {
        _mapView.Map.AddLayer(new LayerMBTile(SQLiteConnection.CreateFrom(mapStream, "map")));
    }
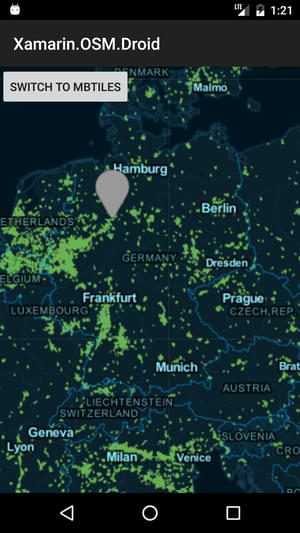
To make the difference between the online map and the offline map clear, I used the dark coloring. Our result now looks like this when the "Switch to MBTiles" button is pressed:
OpenStreetMap can be integrated into your own Xamarin Android projects with OSMSharp at least as easily as Google Maps, and is easier to adapt to your own ideas thanks to flexible data sources. The demo project and all files can be found on bitbucket.
Sebastian Seidel
As a mobile enthusiast and managing director of Cayas Software GmbH, it is very important to me to support my team and our customers in discovering new potential and growing together. Here I mainly write about the development of Android and iOS apps with Xamarin and .NET MAUI.